by Jackson | Nov 20, 2017 | Archery Accessories, Reviews
A Guide to Peep Sights
Regardless of what purpose you will be using your bow, you will need to shoot with accuracy. After all, what’s the point of using your bow if you’re not going to hit your targets? One of the best ways to improve your accuracy is with the help of a sight. There are different designs of sights available, with each of them having its own list of advantages and disadvantages. Peep sights are one of the simplest forms of sight, but they are more than adequate if used properly.
What Are Peep Sights?
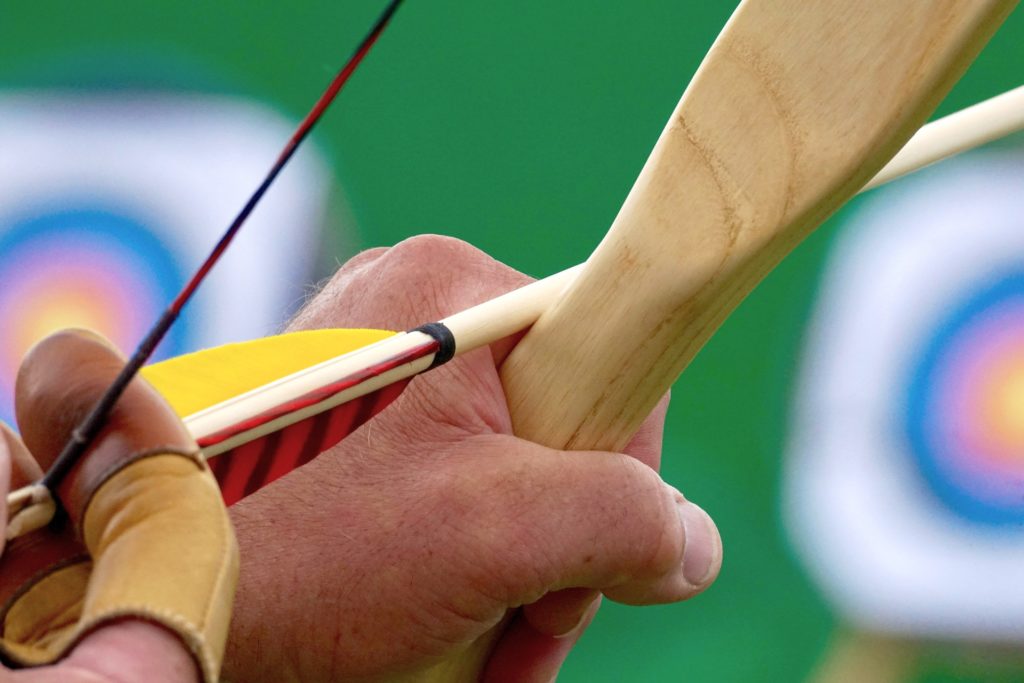
The peep sight is considered as probably the first aiming device ever made. Used for all kinds of shooting devices ranging from bows to assault rifles, the peep sight helps improve shooting accuracy by enhancing the focus of your eyes. Basically, the peep sight works by improving your eye’s ability to see what’s in front. In other words, it helps your eye to accurately judge its target, resulting into more accurate shooting. The science behind peep sights is that looking through a small gap enhances focus, improving aim and accuracy on the process.
Traditionalists love the peep sight, and they have some distinct advantages over other aiming devices. Here are some of the advantages you can enjoy if you choose to use peep sights for your bow.
- Easy to use – One of the best things about the peep sight is its simplicity. Using this device is easy. All you have to do is focus your eye on the sight and you’ll have a clearer look at your targets. Installation and maintenance are also simple. You won’t need batteries to use this device, and it is not prone to common issues such as fogging. A more detailed look at how to use your peep sight will be discussed at a later part of this article.
- Low price – The peep sight is remarkably inexpensive. With alternative aiming devices such as optics and lasers being quite expensive, it is a relief to know that you can purchase an aiming device at an affordable price. When you consider the accuracy of these devices, the peep sight is the most cost-effective aiming aid you can get for your bows.
- Accurate – Of course, an aiming device is useless if it is not accurate. The peep sight is a time-tested device with remarkable accuracy. In fact, the best peep sights are tested to be accurate in distances of up to 200 meters. This may not seem much, but that is a lot of useful range for most purposes. The peep sight is proof that you don’t need to spend a ton of money to get an accurate and useful aiming device.
How Do They Work?
 You must be wondering how the peep sight works. In the earlier part of this article, we discussed the mechanism behind the function of this sight. While that partially answers the question, you can better appreciate how the device work by actually learning how to use it. Here is a step-by-step guide on how to use your peep sight.
- Find the right-sized peep sight – Size matters when it comes to using peep sights. There are some situations when using a smaller sight is better, and there are also situations when going for a larger sight actually helps you. Basically, going for a sight with a smaller aperture allows for better accuracy and range, as it gives a clearer and more focused view of the target. A small peep sight is better for shooting in broad daylight and situations where obstructions are minimal. In darker environments, a peep sight with a larger aperture is a better choice as it improves low light visibility.
- Properly install the sight – You will also need to learn how to properly install your peep sight. This is because improper installation could lead to inaccurate shooting, and can even damage either your peep sight or your bow. Installation instructions are slightly different for different kinds of bows. A later part of this book will focus on how you can install a peep sight in your bow properly.
- Learn to take aim – One thing about using peep sights is that you actually have to get used to using it. People who are just getting started in using peep sights tend to shoot their targets either too high or too low in the first few tries. It is recommended that you do some practice shots with your bow during the first few times that you’re using a sight. Eventually, you will find your sweet spot when aiming. However, if your aim is still off, you might have to consider adjusting your peep in the string. The peep should also be anchored securely, as even normal use can move it.
Best Peep Sights on the Market Today
-
- G5 Outdoors Meta Pro Peep Hunter Sight
G5 Outdoors has patented a convex interior diameter for this sight. This design helps in maximizing field of view even under low light conditions. This design also helps in providing a perfect circle aim when the peep is tilted. The string groove is likewise designed to be convex, allowing the sight to make contact with the string at a smaller surface area. This significantly reduces string wear, prolonging the lifespan of your bow string. In fact, G5 Outdoors is so confident with their design that their product comes with a “No-cut Guarantee”. Available in different sizes and colors, the G5 Outdoors Meta Pro Peep Hunter Sight is one of the best products of its kind right now.
One thing going for this product is it works, plain and simple. Nearly all people who bought this product loved its accuracy, saying that it significantly helped them improve their aim. Many also like its build quality, noting how sturdy it looks. Another thing going for this product is the number of options available. Aside from being available in 3 different aperture sizes, you can also get this product in 6 different colors. If you are looking for a peep sight that works, then this is the product made exactly for you.
- Radical Archery Designs Super Deuce 38
This peep sight designed by Radical Archery Designs is made for the serious archer. It is built using anodized aluminum for light weight and excellent durability. It is mounted into the string at a 38 degree angle (hence the name) to provide users with a true round aperture at full draw. It has dual radius slotting that removes sharp points that can damage strings. It also has a safety groove that prevents accidental removal during dry fire. Available in different aperture sizes and colors, you can pick the Super Deuce 38 that fits your needs.
The Radical Archery Designs Super Deuce 38 has garnered strong reviews from those who have used it. People like it because it is easy to install and its rounded design protects the string from damage. It is also very accurate if installed properly, resulting to improved shooting almost right away. Perhaps the only downside to using this peep is that it might take some time before you get used to it. Overall, this peep gets the job done and should be able to provide excellent value for your money.
- Precision Peeps Sight
This product by Precision Peeps has a design that is completely different compared to other peep sights available on the market today. It has a unique vertical post found inside the peep. You can use this post as an additional point of reference for aiming. The idea is that instead of lining up 2 different apertures, you can line up the pin at the top of the post, making it easier for you to aim your shots. With this extra point of reference available, you can theoretically improve your shooting accuracy.
The reviews of the Precision Peeps Sight are mostly positive, a testament to the general effectiveness of this unconventional peep sight. The vertical post does its job as advertised. While that alone won’t raise your accuracy, it at least provides an additional point of reference for aiming should you be uncomfortable with traditional aiming. Of course, just like with any unconventional design, it will take some time to get used to it. However, once you get accustomed to its design, it does help with accuracy. Overall, it’s a good-quality product with a different approach.
How to Install a Peep Sight
Learning how to install your peep sight is crucial for maximum accuracy (and therefore maximum enjoyment). The installation process for recurve bows and compound bows are slightly different, but both procedures are not too complicated.
For Recurve Bows:
First, place your bow on its side. The side of the bow where you will place your sight should be facing upward. The sight should be aligned facing the front of your bow. Line up the holes in your sight with the holes found in the riser of your bow. With the help of a screwdriver or an Allen wrench, mount the sight into the bow. Check if your bow is at the right level using a string level. Place the level on the sight until it is accurately aimed. Once done, fully tighten the screws to secure the aim in its place, making sure that the arrow, when placed in your bow, does not come in contact with your sight. Adjust the telescoping frame of the sight to avoid eye strain while shooting.
For Compound Bows:
With the help of a bow press, determine the ideal position to place your peep sight. The ideal position is where you can accurately locate the center of the string. Mount the sight in place with the help of a screwdriver or an Allen wrench. Confirm if the sight is centered by making a practice aim, checking if your eyes are correctly aligned with the sight. Your peep sight should go square with your eye, no matter how many times you try and aim it. Adjust the height of the sight if needed. Once the aim is properly positioned, tie in the sight using the stop knots found at the top and bottom of the peep sight.
Conclusion
 Just to recap everything, the peep sight is a device that helps improve your aim by improving your eye’s focus on its target. While not as advanced as other aiming devices, it is still very useful, thanks to its simple design, affordability, easy usability, and solid accuracy in most shooting conditions. You can choose from different aperture sizes for use in different shooting conditions. Installing a peep sight in a recurve or compound bow is relatively simple. However, if you find it too difficult, you can ask the help of a professional for proper installation.

by Jackson | Oct 20, 2017 | Archery Education
Beginner’s Guide to Archery Form
Aside from using a properly tuned bow, another critical element in archery is developing an effective archery form. Your bow and your form should work together perfectly so you can develop your own archery technique much easier.
Proper and effective archery form involves the mastery of the six stages of shooting. It is important to work on improving these areas in order, from assuming your stance to following your shot through. Each stage must be completed properly to achieve an effective form.
Here are the six stages of shooting in archery that you need to master in order to perfect your archery form:
Stage 1 – Assume the Shooting Position
In this stage, you assume the position of your preferred archery stance.
There are three stances that you can assume; the square stance, the closed stance, and the open stance. Each stance serves unique purposes that make them more helpful in certain situations. However, for beginners, I recommend starting off with the basic archery stance, the square stance.
Positioning yourself correctly for the stance is important because it’s what will set you up for shooting stability. The correct posture and body alignment can directly affect the way you rotate and move your body when you start to aim and shoot, so practicing this stance is essential to your archery success.
How to get to the square stance:
- Position each of your feet on each side of the shooting line. If you are right handed, your left foot must be placed in front of the shooting line, parallel with your right foot. For left handed archers, the right foot must be placed in front of the shooting line, parallel to your left foot.
- Place your feet shoulder width apart. This will keep you balanced and stable.
- Keep your feet in line with each other or parallel to the shooting line. A correct square stance will create a line that is perpendicular to your target. (You can measure where you are aiming by placing an arrow in line with your toes and stepping back the shooting line to see where the arrow points)
- Position your body upright and turn your head to face the target.
- Move your hips towards your core to flatten your lumbar or lower back area. At the same time, move your chest towards your core and push your shoulders downward. This creates what I call “muscular focus” where some tension is exerted to focus your muscular energy on your intention to draw, aim and shoot the target.
To perfect this stance, repetitive practice is needed. Repetition will improve your muscle strength, postural endurance, and develop muscle memory. You should dedicate some time practicing the stance while in the archery range. I suggest that you spend at least 3 practice sessions for improving your stance. You can even practice your stance at home without a bow by mentally picturing the shooting line and the target range.
Stage 2 – Nock the Arrow
 The second stage of improving your archery form the most basic step in archery is nocking the arrow. Nocking is holding the arrow and securing it in correct position by snapping its nock on the bowstring. It is pretty simple but quite tricky too. I have a hard time with this process sometimes, too. But it’s also in this process that I find out if my bow needs some tuning up.
Nocking may seem like a simple task, but it is a critical step that can affect your shooting accuracy. Since the arrow is nocked onto your bowstring, the process directly influences the direction of the release. If you nock the arrow incorrectly, your shot will surely miss.
How to nock the arrow:
- Hold the arrow by the shaft part behind the vanes or fletching, right near the nock, and place it on the arrow rest.
- Rotate or turn the shaft until the index vane in the correct position. In a Recurve bow, the index vane should point opposite the riser. In a compound bow, however, the positioning will depend on the type of arrow rest used.
- Ensure that the index vane is properly aligned and then snap the nock onto the bowstring, at the nock point or below a nock locator.
- When you have positioned the arrow correctly, you are now ready to set. Setting, after nocking the arrow, is the positioning of your hands and fingers on the grip and around the bowstring.
- To set, position your bow hand (hand that holds the bow) by placing it around the grip, with the thumb pointing at the target just above the grip.
- When you raise the bow, the fingers must be relaxed and the knuckles of your arrow hand or bowstring hand (hand that holds the arrow in position and holds the bowstring back) must be flexed only slightly up to 45 degrees in angle.
- Wrap the three fingers of the bowstring hand below the arrow shaft with the string located by the first grooves of these fingers.
- The back of the bowstring hand must be relaxed as you prepare for set-up. Setting-up is the alignment of your bow arm’s elbow in relation to the proper positioning of your shoulders as you raise the bow.
- Once your bow hand and bowstring hand are in position, extend your bow arm forward by rotating the elbow vertically.
- Raise your bow arm slightly above your nose and point it towards the target. Your bow hand must be slightly positioned above your aim. As you do this, position your bowstring arm’s forearm in line with the arrow shaft and make sure the bowstring hand is positioned at your nose’s level.
- When you have properly nocked the arrow and set your arms for shooting, you’re ready to execute the next stage.
The key to proper nocking of the arrow is to focus on your hands’ movements and positioning. Identify the angles of improvement and work on them until you have achieved the correct positioning of your arms in relation to the nocked arrow and raised bow.
Stage 3 – Draw and Anchor the Bow
Drawing is a critical step in your archery form that requires correct alignment of your bowstring arm’s movements when drawing the bow. The correct angle and positioning of your bowstring arm will determine the success of your release.
How to draw the bow:
- Your drawing hand (bowstring hand) must be positioned at your nose level or slightly above it.
- Draw the bowstring back straight towards the side of your face.
- Move your drawing arm’s elbow further back and down. This will displace the draw weight onto your back muscles.
- Move or rotate your shoulder backwards and downwards, then move your drawing elbow until it is positioned parallel to the arrow shaft. If you can’t position your elbow directly at the level of the arrow shaft, you can position it slightly higher, but never lower than the arrow shaft.
- When you have drawn your bow properly, you can now proceed to anchoring.
Anchoring is the securing or locking of your body and bow into consistent position using anchor points. Anchor points can be your thumb, index finger, or the tip of your nose. You can also use a kisser button to secure your bow’s position with your body’s alignment.
For beginners, I suggest using the index finger as an anchor point. Though some beginners find using a kisser button more helpful, it does kind of affect the quality of the bow’s release because it adds more weight on the string.
How to anchor the bow:
- When you draw the string towards the side of your face, pull it back until the tip of your index finger reaches the corner of your mouth.
- Tuck your thumb into your palm but keep it relaxed. Also, your little finger must be folded towards the palm and keep it relaxed.
- Press your hands nearer to the side or your face until the index finger is resting on the corner of your mouth.
- Make sure the string is not blocked or interrupted by your nose. It should be placed to the side of the nose.
- Stand ground and hold the whole draw weight on your back by transferring it from the arms and shoulder.
- Hold your position for the next stage.
To successfully transfer the draw weight to your back, rotate or shift your torso to align it with the bow arm’s position. By aligning them, you are placing them in line with the drawing arm. Rotate your drawing arm’s shoulder towards the back, then hold. Transferring draw weight is an archery technique that needs mastery so you can hold your drawing stance more effectively.
Stage 4 – Aiming
 Aiming is a critical step that requires you to focus both on your target and in maintaining your archery form. If you focus either only on the target or your stance, you are likely to fail and miss.
How to aim:
- While holding, look down on the arrow’s shaft and direct its point to the target.
- Aim and pause to reevaluate your stance. If you moved a bit, realign your body and shift your weight properly. Relax your fingers.
- Sight up the string to make sure it is lined up with the bow limbs’ center.
- Refocus your attention to your target and prepare for the next stage.
Always be careful with how you refocus your attention. Make sure that you hold your position securely after refocusing on your form and avoid sudden movements that can shift your body out of alignment again. Holding your position while trying to get the best aim can be difficult, but constant practice will build endurance that will help you accomplish this stage easier.
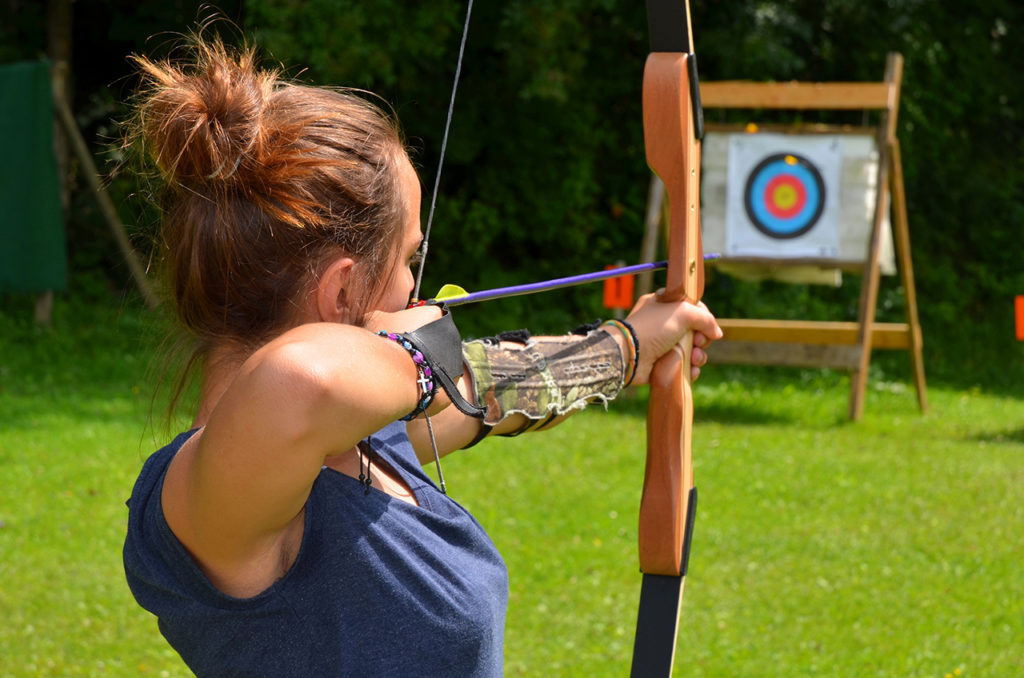
Stage 5 – Release the String
 The release stage involves expansion, an important step where you expand your chest as you release the string. It’s like taking in a deep breath to open your core or center for the release.
How to release the string:
Man and woman practicing archery
- Expand the center of your chest by rolling your pectoral muscles outward while keeping your bow arm and shoulder stationary in position.
- As you expand, release the bowstring from your fingers by carefully pushing them out of the way.
- Continue expanding after the release but keep your position in place. The pectoral muscles should continue to expand outwards and the back muscles should increase the intensity by rolling the scapula of your shoulder towards the spine.
Expansion during the release is important because it allows the archer to get a better shot by letting the string go cleanly and smoothly.
Stage 6 – Follow Through
Following through is the final stage in the basic archery form. It takes place as you continue to expand after the release. It is like looking back on the target that you were focusing on during your aim and fully committing to hit during the release.
How to follow through:
- Relax your drawing hand after the release but keep your position and continue to increase the tension in your back muscles by rolling the shoulder’s scapula towards the spine. This will also make your
 drawing hand or arm roll towards your back.
- Move your drawing hand straight back alongside your face. Pause just below your ear or behind your jaw.
- Keep holding the bow up in your bow hand after the release as you follow through.
- Continue the expansion of your chest and the tension of your back muscles until you see the arrow hit or reach the target.
- After the arrow hits the target, you can lower your bow and rest your drawing arm.
Most beginners think that the release is the final step because the follow through step is not clear to them. However, if you skip the follow through, you might end up committing these newbie mistakes:
- Dropping or lowering your bow right after release – dropping the bow immediately after release is the common cause of steering the arrow in a different vertical direction. This is because the arrow needs enough time to successfully clear the arrow rest and fly straight to the target.
- Moving or swaying your bow to the side to take a look at the arrow’s flight towards the target – moving the bow sideways might also cause the arrow to change direction when it fails to complete full clearance from the arrow rest.
These mistakes that steer the arrow away from the original aim do not only reduce accuracy; they can also be dangerous. The accidental steering of the arrow away from the original target leads to directing them towards accidental targets like objects, animals, or people that are positioned within a distance around the shooting range.
Concluding Tips
Now that you know the six stages of shooting, all you need to do is keep on practicing. Shooting excellence doesn’t happen overnight, it takes plenty of exercise, dedication, patience, and persistence. Remember, repetitive practice develops your muscles, so maintaining your form gets better in time.
I suggest that you create a practice plan for each of the shooting stages so you can master them one at a time. There is no stage that can be skipped or taken for granted; they are a progressive sequence of the archery form that will help you achieve archery success and mastery.
by Jackson | Jun 23, 2017 | Choosing a bow
The Best Compound Bow 2017
Today we’re here to find out what is the best compound bow 2017. If you wish to level up your archery skills, you can try using a compound bow. This type of bow uses a levering system that gives the bow a unique let-off capability. Choosing the best compound bow of 2017 will not only promote efficiency, but will also help you develop more of your skills to land those arrows with precision.
Those who are interested in finding the best compound bow for hunting, for instance, always choose based on some important considerations. Using their criteria, bows should be: compact for easy control, fast enough to have the flattest possible trajectory, lightweight, and smooth to shoot. It should also be quiet enough so as not to alarm their prey while hunting.
To help you out in your search, here is a short list of options for the best compound bow 2017:
This is a great option and runner up for best compound bow 2017. If you are just starting out or if you do not want to spend an arm and a leg then this is the compound bow for you. This bow is made by Man Kung from Taiwan.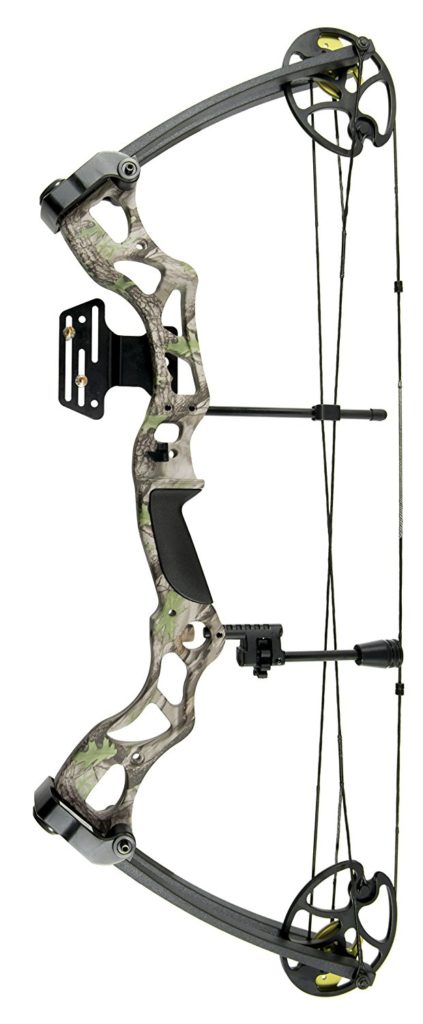 Man Kung has been in business for decades and is trusted in manufacturing parts and add-ons for many US based big brands. The fact that this one is crafted in Taiwan is definitely not a downer.
This is one of our runner ups for best compound bow 2017 and is an excellent bow across the board. Its draw weight goes up between 50 to 70 pounds. It has an adjustable draw length of 25 inches to 31 inches. This makes it easy to adjust even for beginner hunters. It shoots at a staggering speed of 310 fps.
This bow is of high quality and is made from a modern composite material. It is sturdy and durable enough for serious hunters. The aluminum riser is carefully crafted with lots of cool cut outs that give it a modern look. The pack includes accessories like an arrow rest and a peep sight. These, however, can be bought separately if you wish.
Bow performance is smooth, with bearable noise and vibration when shooting. This bow is solid enough for bow hunting with an axle-to-axle (ATA) length of 35 inches.
This bow also has an aluminum dual eccentric cam system for added durability. It is not only good for hunting but for bow fishing as well. You simply have to attach a bow fishing reel to the bow’s pre-drilled mounting holes. This hunting bow from Leader Accessories comes in a stylish autumn camo or black finish.
The list of pros for this product still outweighs the cons, making it a worthy option for anyone looking for the best compound bow 2017. To compare:
Pros
- Draw weight and length can be adjusted
- Provides great precision
- Sturdy enough to be used for back-to-back archery sessions and hunting
- Can be utilized for bow fishing
- Its great pacing makes it a good option for hunting sessions
- Its pricing is affordable
- Availability of several color combinations
Cons
- Limited to right-hand users
- Extra accessories should be bought separately
- Might be a little heavy for beginner archers
Overall, the Leader Accessories 50-70 Hunting Compound Bow is a great steal for a price of $250. It is well crafted, shoots very accurately, and can easily keep up with models that cost double the price or even more.
This compound bow is our second runner up for best compound bow 2017 and is good for hunting and can be used both by beginners and veterans. Its draw weight ranges from 19 to 70 pounds, while its draw length goes from  19 inches to 30 inches. It has an IBO speed of 320 fps and an ATA of 28 inches. The brace height measures 7 inches, covering an 80% let-off.
It is sturdy and durable at a bow weight of 3.31 pounds and an aluminum bow riser built. It has a CNC 7075-T6 bow cam can easily be adjusted in just two minutes, even by kids. Its great performance is assured by the high quality of materials used in its limbs and it bow string, imported from Gordon Composites in the USA and BCY USA respectively.
Since this compound bow comes as a package, you can find the following already included in your purchase: bow, five-pin optical bow sight, brush arrow rest, braided bow sling, rubber stabilizer, bow release, D-loop, peep sight, Allen keys, string wax, bow stand, 6 pieces of arrow quiver, limb dampers, arrow puller, and a carbon mix arrow (18” x 30″). All these accessories amount to a total of $200.00 in value. This is already a great deal for a bow that comes with everything you need.
What is great about this bow is that it gives you flexibility when it comes to draw weight. With a range of 19 pounds to 70 pounds, it is suitable for all games (small, medium or large). While some would tend to make the wrong assumption of this bow being an off brand bow or a low quality product because of its weight, this bow will prove you wrong. It will surely provide you a top notch compound bow complete with all the accessories.
This compound bow package from FBA Service is light and compact. It offers great value for money with all the additional accessories already provided in the package. Its durability is affected by how well the bow is used and maintained.
Pros
- Good for hunting
- Suitable for small, medium, or large hunting game
- Great all-in-one package deal
- Good product for a reasonable price
Cons
- Some false perceptions and speculations on the quality of the product and its accessories
- Available only for right hand version
Our third finalist and clear winner of the title best compound bow 2017. The Diamond Archery Infinity Edge Pro is crafted by one of the famous compound bow manufacturers in the world, Bowtech. This bow is specially designed for novice level archers, kids, and females. It has a wide variety of adjustable settings which is important while teaching archery to kids and ladies. It is also good for target shooting sessions.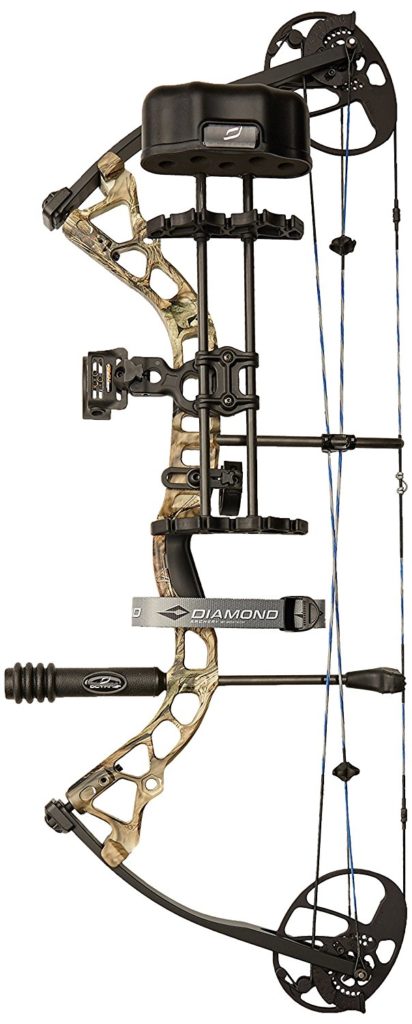
The usual package of the Diamond Infinite Edge bow package will give you everything you need to use the bow straight out of the box. It has a 3-pin tundra sight and a tube peep sight, making it a breeze to aim. The tundra sight’s fiber optic lines are great for starters.
The 5″ ultra-lite octane stabilizer is a good add-on that does not have vibrations while shooting. This makes the whole draw cycle more steady and accurate. Apart from that, it gives more balance to this bow, further adding to its already comfortable draw cycle.
The package also includes the Hostage XL arrow rest, which has a simple design but is sturdy and has no mechanical parts. This is considered as an adequate arrow rest for starters.
The Dead Lock Lite Octane quiver with 5 arrows capacity is a fine and practical add-on too. It is easy to use and friendly for beginners with its quick-detach system.
A comfort wrist sling and a BCY string loop come in the package as well. The BCY Loop is attached to the part where the nock is on the bowstring. It is used to pull or hold the string with the use of a release aid. With this mechanical release, you will have a quicker release that creates less torque on the string from your fingers.
The bow supports dual cam eccentric systems which are elliptical in shape and are perfectly synchronized for a perfectly smooth, straight flight. The cable is also very smooth and is the perfect fit for beginners and women. The shooting IBO speed of the bow is 310 fps. As the bow is specially designed to be lightweight in nature and comfortable to shoot.
Once released, there is a built-in string stopper which will protect the bowstring from vibration. There is also zero-hand shock which is another highlight of this product. Normally, light vibrations or shock will be felt by archers in their hands after shooting the arrow but this compound bow does not pass the shock or vibration to the users. This is actually one of the reasons why it is preferred by women and children.
The Diamond Archery Infinite Edge is one of the most convenient compounds because of its adjustability. Its draw length can go from 13 inches to 30 inches, while its draw weight can be adjusted from 5 pounds to 70 pounds. Set at 70 pounds draw weight, 30 inches draw length, and 310 fps IBO speed using 350 grain arrows, the Infinite Edge Pro produces 74.7 of Kinetic Energy (KE). This means that it is capable of going for the roughest game with no problems and is suitable for hunting activities.
The axle-to-axle length of the bow is 31 inches, which is appropriate if you are above 5.10 feet in height. At 3.1 pounds in bow weight, it’s considered as a standard weighted bow. While there are bows that are lighter or heavier, 3.1 pounds is considered to be the perfect weight for an archer to shoot their target with better precision and power.
The compound bow could also be used for bow fishing, if you wish. The Infinity setting makes this compound fit for bow fishing as it results to a zero let-off. Therefore, it will maintain most of its peak holding weight for the whole draw-circle. This is important in bow fishing as you need to be able to shoot swiftly.
The bow is available in three different color options, a great plus for those who are looking for more stylish options. Depending on their taste and preference, users can choose from: Mossy Oak Infinite, Black Ops and Pink Blaze.
The product definitely speaks for itself as it is incomparable with others considering the quality and its reasonable price of less than $400, just a few of the many factors that make it the best compound bow 2017.
Pros
- Lightweight and highly adjustable compound bow
- Great build quality for the price
- Produces bearable vibrations while shooting
- A highly balanced bow which provides perfect shots
- Adjustable draw weight and length
- Best for beginners and seasoned archers and hunters
Cons
- Need to manually install the peep sight
- Tundra sight and arrow rest can be improved
All in all, the Diamond Infinite Edge pro compound bow is one of the most versatile bows in the market. It is user-friendly for all ages, experience levels, and for whoever wants to start taking up archery as a hobby.
Choosing the Right Bow for You
Looking for the best compound bow 2017 seems to be challenging due to the wide array of models and manufacturers available out there. Regardless of your experience, age, and proficiency level, it is best to try as many bows as possible before you actually buy your own equipment. Getting a feel of the various bows in actual use will help you manage your expectations and be realistic in your choices.
Compound bows are versatile, light, and overall a wonderful piece of equipment for hunting and target practice.
Look for a bow that is simple, fairly priced, and made of quality materials that will surely help you learn the basics of archery. You can just then transition into a more advanced bow when you are already comfortable with shooting or when you are ready to begin competing. Choosing to have the simple bow as your starting equipment can help save a lot of money in the long run.
Starting out with more complicated equipment is not preferable as your needs might change as your skills improve. This is true especially for young learners that are just starting to discover the sport. However, you should ensure that the first compound bow that you buy and use gives you outstanding performance. Yet it should be flexible enough with either a non-specific draw length or an adjustable draw length. This will allow you to make adjustments in your form as well so you can work on improving your game.
Other important considerations that you should include in your criteria are: comfort; ease of handling; controllable and light draw weight, bearable bearable noise and vibrations, and affordable. Your choice of the best compound bow 2017 should be flexible enough to adjust to your form and skill as you grow within the first 6 months to a year of shooting.
by Jackson | May 1, 2017 | Reviews
The top reasons that you need to have the best archery target you can get your hands on is to protect your arrows, make sure the arrows get stopped, and has a long target life. These sound simple and I’m sure that most targets will do this for a couple of arrows, but let’s say you shoot 10 arrows a day for a year. That’s 3,650 arrows into one target every year! Even if you shoot half that or less most targets that seem OK at first glance may not hold up to this level of use, especially if you want to shoot more than 10 arrows a day. Most of my acquaintances from backgrounds in archery and bow hunting agree that most of the time, you get what you pay for with targets. It is far better to buy a more premium target as your first archery target so that you can get used to shooting at the same target continuously, at the same time getting more mileage out of it and ultimately saving money.
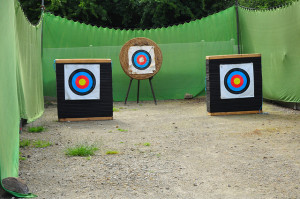
Archery targets
First, a few tips on caring for your target.
- Sun and weather can make your target wear down much quicker. If you can’t put it somewhere covered, at least try to put a tarp on it. That being said, a couple of weeks here and there in harsher elements shouldn’t have too much of an impact on your target if it is well made.
- Keep your archery targets away from pets or animals, especially dogs! I learned that one by experience. I am amazed what can be done in one minute by two teething Labrador Retrievers.
- Don’t use broadheads when practicing with a target, broadheads are designed to tear and will greatly decrease the life of your target. Be sure to use practice arrowheads if possible.
Now on to the best archery targets
The 5 Best Archery Targets
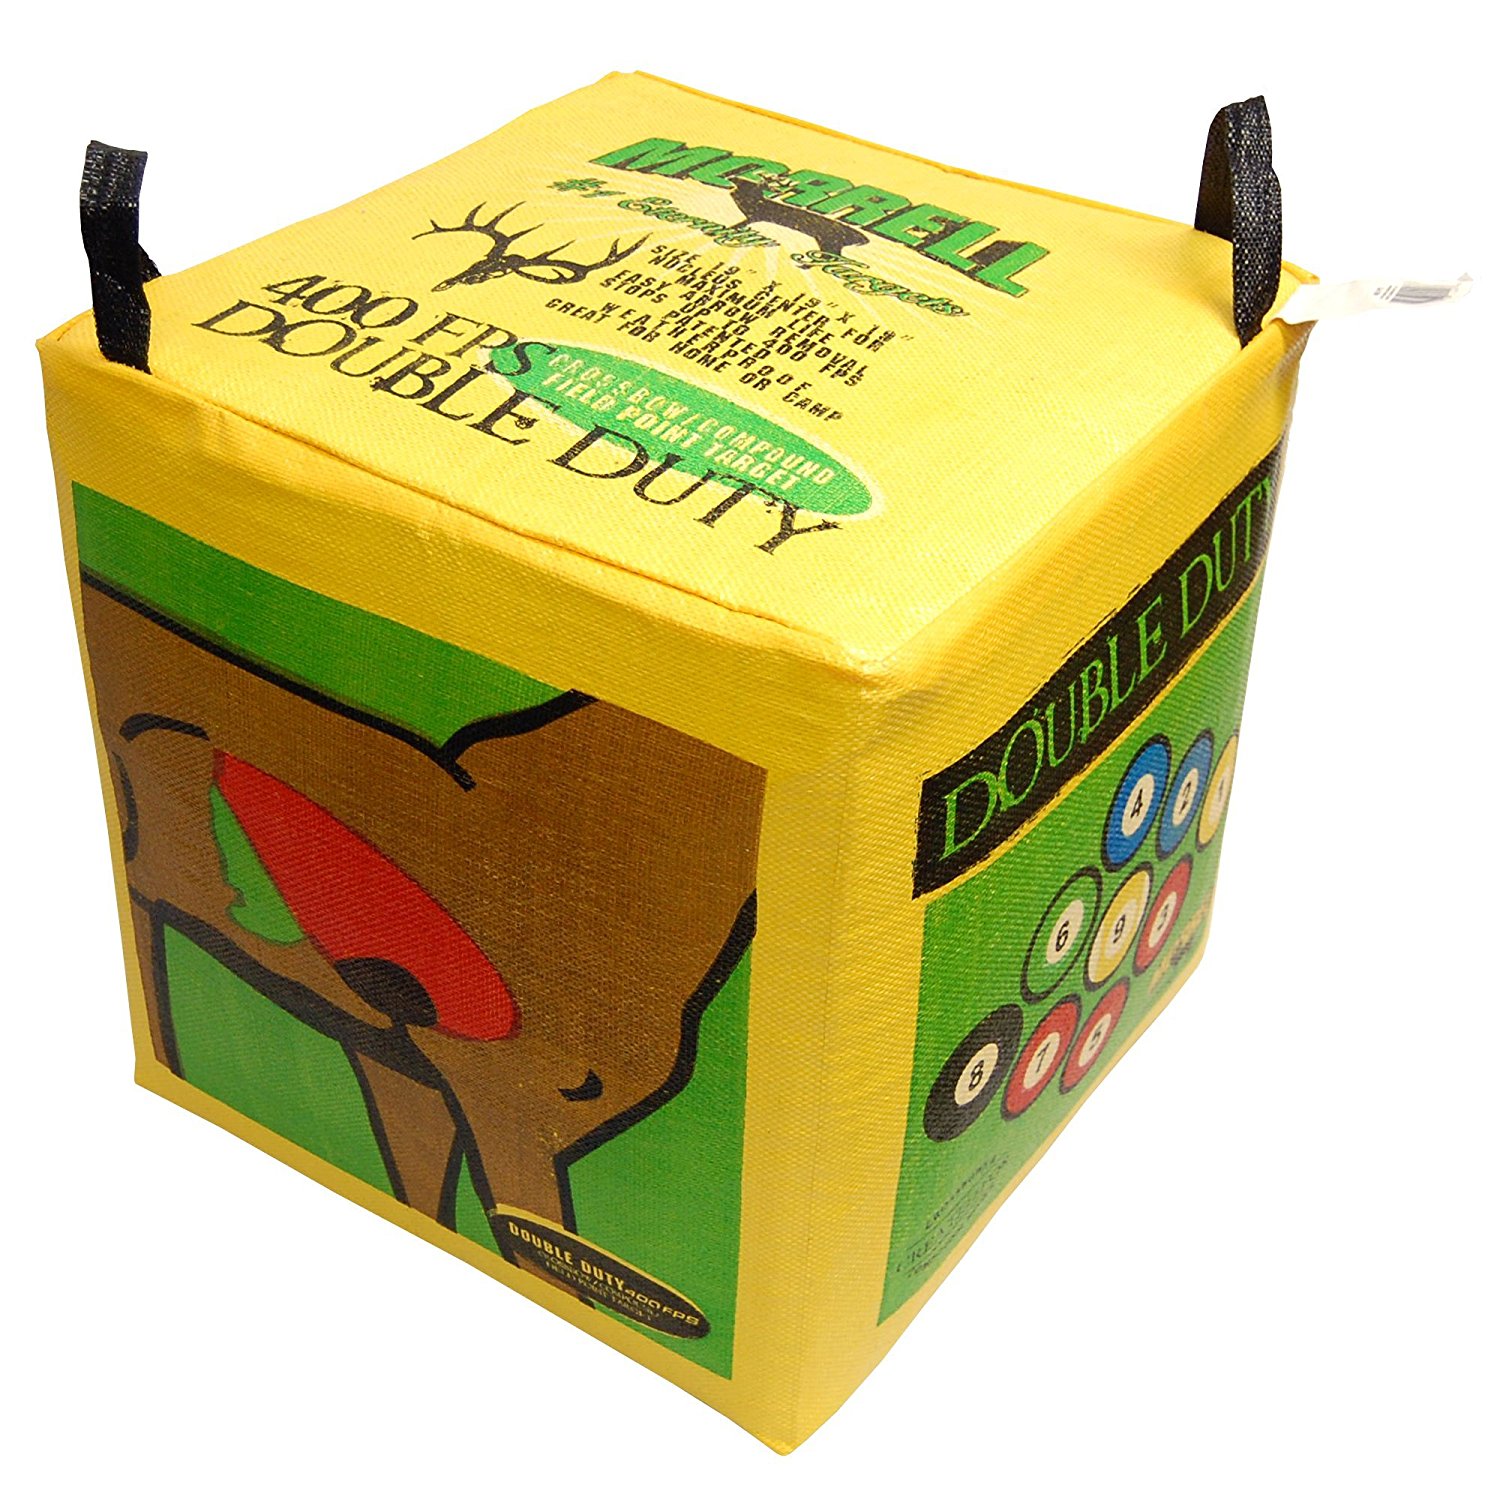
The two big things with targets are stopping power and how easy it is to pull out your arrows. This target does both very well. It’s only made for target points, but don’t let that stop you because this block will hold up for years of use. This one comes in white and yellow with different shoot able sides and faces. I found the link for the yellow one. This target is pretty big and heavy at 19 inches on each side and 32 pounds, you shouldn’t lose it. Priced around $70-100, this is an excellent target.
Shoot the hurricane! This bag target does a great job of stopping arrows and letting you pull them out without much effort. A bag target normally does better with a stand, but this one still seems to do very well on its own. The burlap type material will eventually wear out, but it’s going to take a lot of use to get to that point. The target has a set of deer vitals on the back to double the life of the target. Priced around $50, you get a great target that should last for years.
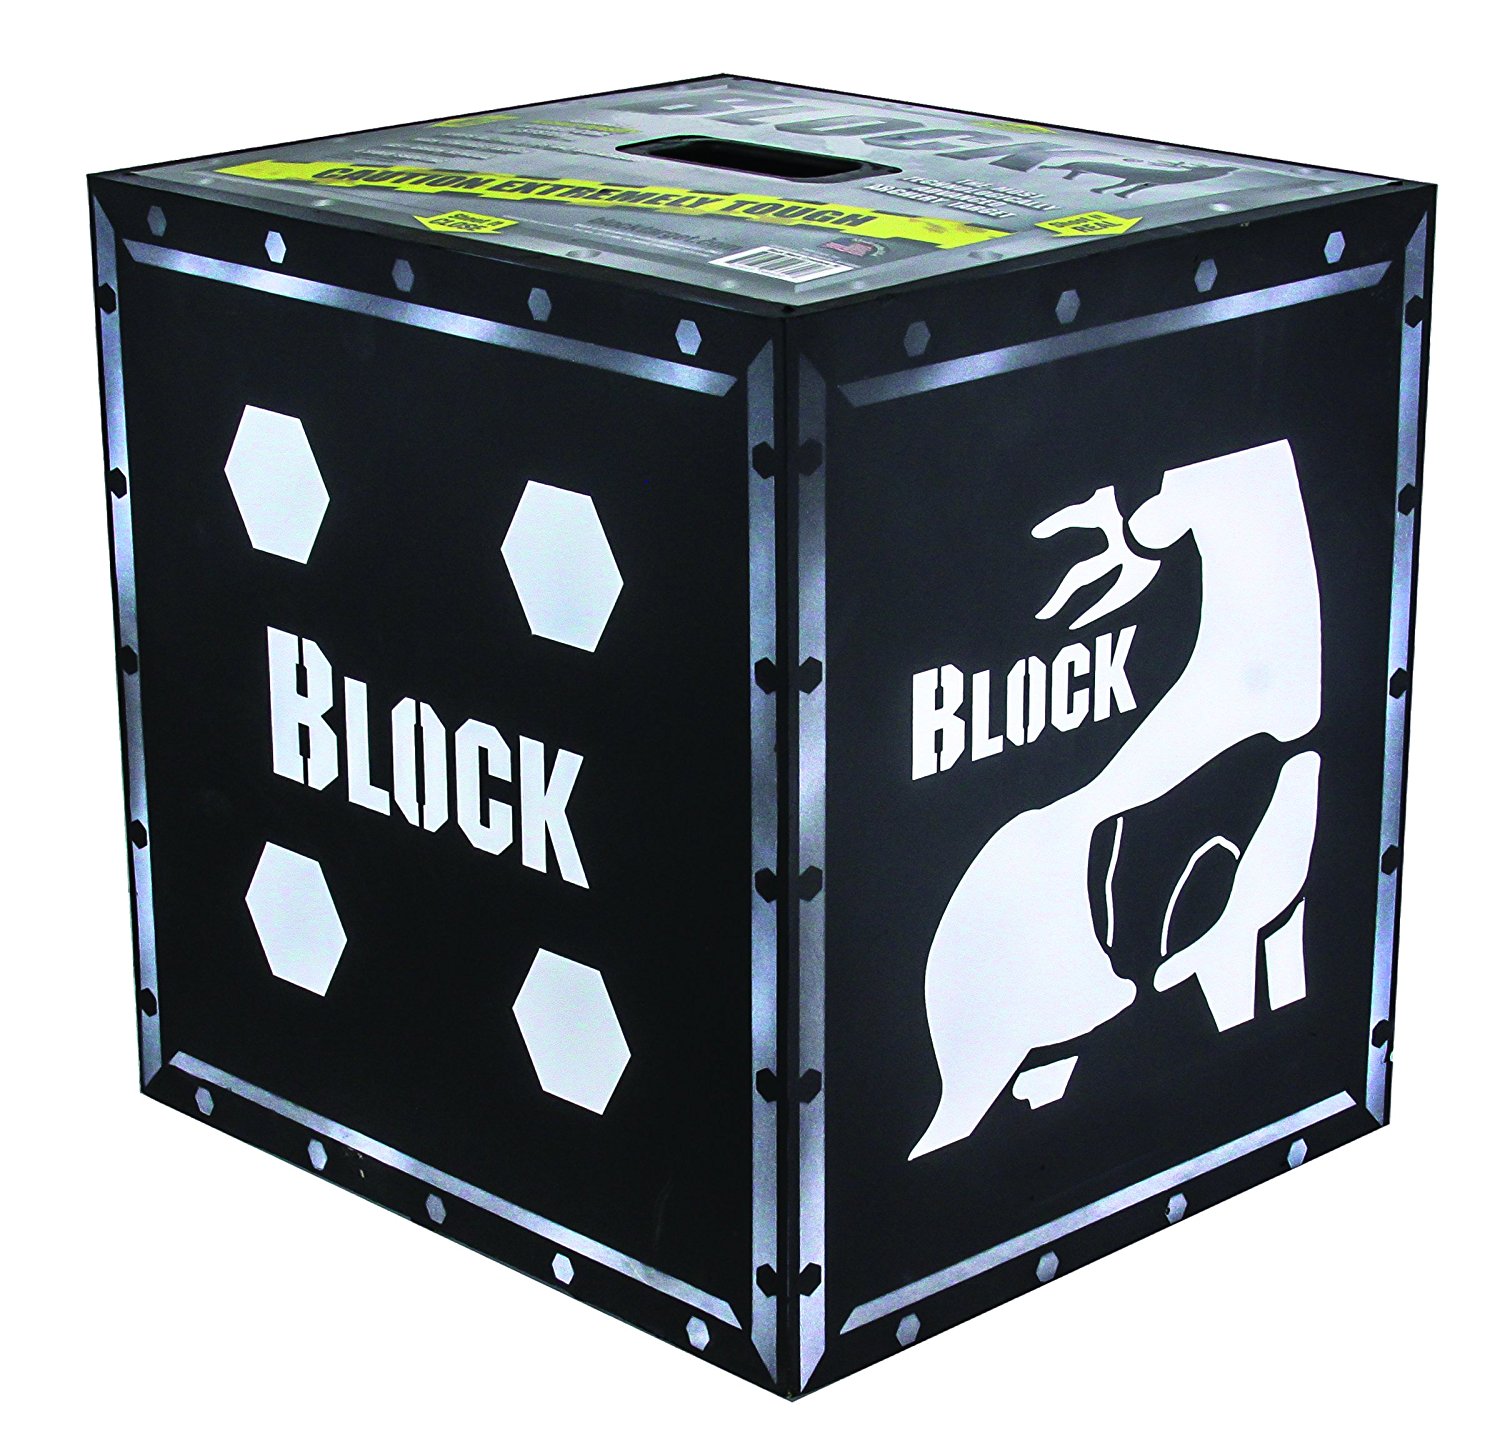
This is the target that I use at home. I love shooting the block. This is a combination target which means that it can handle field points and broad heads. You can shoot all 4 sides and the black and white gives you a nice high contrast to focus on. The only downside is that these types of targets grip the arrow tighter to be able to handle broad heads. Broadheads can even rip the foam out of the target, but they can do that to any target. A solid target that will last for a very long time. Priced around $115 -130, you get a great target for the money.
A classic foam layered target that stops arrows through friction, this target has great stopping power. This block is just a bit smaller and lighter than the others so if a heavy target is a problem, then this is the solution. I originally started out shooting a foam layered target and have always had a good experience. This one is no different. If you’re shooting a heavyweight high-speed bow, this one might move a bit. Priced around $70-200, this target works well for all ages
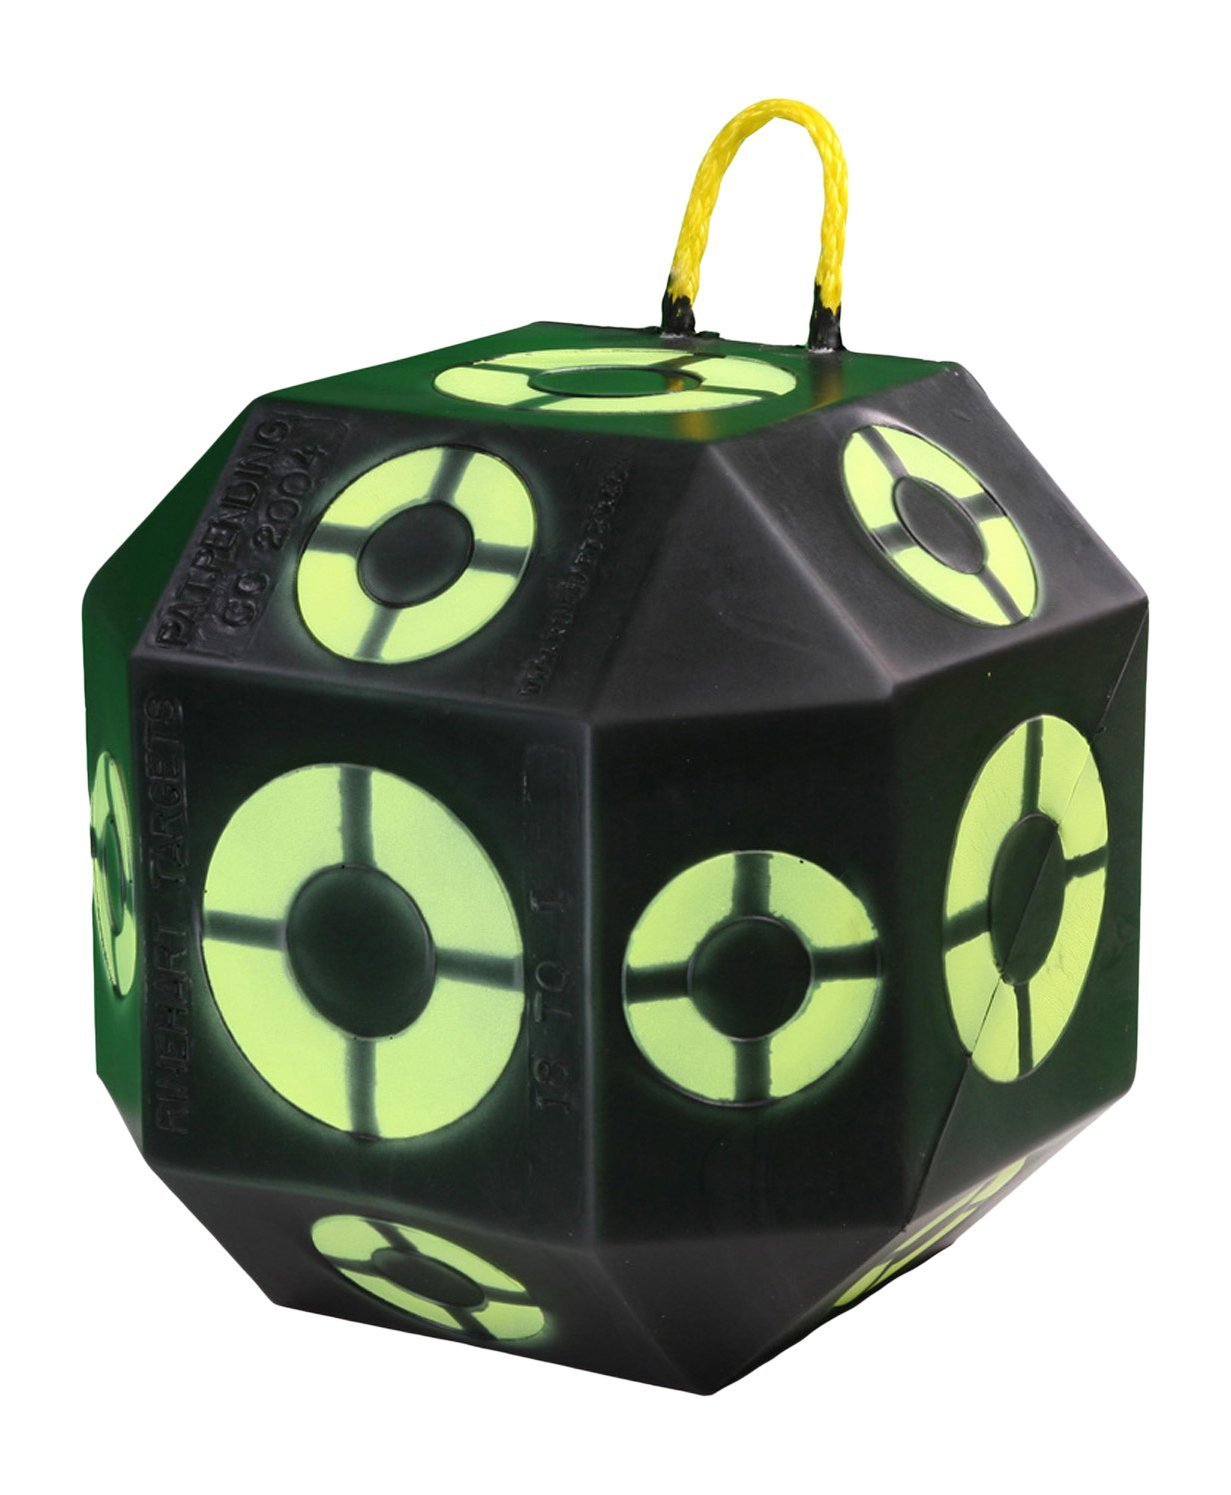
Designed as a broadhead target, this block gives you 18 different spots to shoot at. This one will grip your arrow very tightly to stop broadheads fast. I love the angled corners because you need that if you’re going to be shooting from an elevated position. A lot of people have gotten them with blurry painting so heads up. This target does exactly what it was designed for, stopping broad heads. Priced around $110-150 for an arrow stopping machine.
Shooting a good target makes archery more fun and enjoyable. You’ll get more fun out of your time shooting when you have a target that stops your arrows, lasts a long time, and it’s easy to get your arrows back.
by Jackson | Apr 29, 2017 | Uncategorized
With the reviews on the SAS Siege 55 lb 29” Compound Bow mostly recommending it as a bow suitable for both beginners and expects, this is one particular bow unit deserving serious scrutiny. It carries with it several features that will most likely entice you into buying. Here are the specifics.
Specs:
One thing to note about this bow is the level of power you can get from it, having the ability to go between 40 and 55lbs of draw weight is an incredibly useful feature. Check out also the arrow rests and the sight, many users say that these aspects of this bow model suit them very well.
SAS Siege Compound Bow – Specifications:
• The draw length is 29 inches.
• The draw weight is from 40 to 55 lbs.
• Distance between axles is 41.5 inches.
• Let-off level on the bow is 70%. This means you will hold only 16.5 lbs of the maximum 55 lbs when the draw force is at its peak.
• Maximum shoot speed is 206 feet per second.
• Recommended arrow length is 30 inches. Aluminum and carbon arrows are preferable.
• Bow’s body weight is 4 lbs.
SAS Siege Compound Bow – Highlights:
The SAS Siege is said to be a beginner’s bow, but it can’t be placed fixedly on any particular level of archery expertise. Because of the high level of adjustability and flexibility of its parts. Men, women and children can use this bow for any purpose – hunting, target shooting and even general practice.
• It features compressed ABS limbs. The implication for this is that the engineering of the bow ensured that it has balance, has the right weight and the right level of strength. This feature makes it a bow that can last for years.
• The bolt is adjustable. Draw weight will be decreased by about 5 lbs when the bolt is loosened. Vice versa, it will increase by the same amount when the bolt is tightened.
• The limbs are supported by back pivoting pockets. This is the feature that makes the bow possess accuracy that is far superior to others.
• There are cut outs in the riser of this compound bow. The purpose is to make it have a waffle-like appearance.
• This bow can take a force of 55 lbs when its string is pulled to its maximum draw. That big force magnitude even if at this point the cams are still not activated. When launched the arrow will have a velocity of 206 feet per second.
• This bow is for right-handled people only.
• The sight is adjustable.
• Replacement/repair of damaged parts is covered by a warranty. In addition, there is a three-year warranty from the manufacturer.
SAS Siege Compound Bow – Pros and Cons:
The SAS Siege is one of the most inexpensive compound bows for beginners available in the market. The manufacturer is a Taiwanese company and the USA distributor goes by the name of Southland Archery Supply (SAS). The latter is the one that offers the warranty for parts, so you know where to go just in case you need replacements or repairs.
With the low pricing, which of the parameters have been compromised? Let us find out.
Here are the Pros:
• Some parts and systems in this bow are able to be upgraded. For one, it comes with an adjustable 3-pin sight which you can upgrade to something like a 5-pin type. The original sight is adjustable, which means you must carefully tighten it into its hole to achieve a good level of stability.
• This bow is available in three different finishes, meaning you can choose a unit that will suit your personal taste. Available finishes are Black, Autumn Camo, and the Black/Silver combination finish.
• Its ability to be upgraded is supported its many “waiting” holes. There will be no problems if you want to mount a D-loop, a peep, or a quiver aftermarket.
• Finger-shooting is highly possible for this model. You can finger-shoot with almost instinctively even without using a fiber optic or a peep sight. It is one reason why this is a good bow for beginners and archers who already own a recurve and would to switch to using a compound.
• This model is quieter compared to more expensive units and has less vibration, an incredible advantage for anyone wishing to use this bow for hunting. If there is a need to further lessen the vibration, you can opt to install a stabilizer and a string silencer. This can help even with minimizing the recoil effect.
• The let-off of 70% is pretty a welcome feature for starters. It will allow them to focus on form and aim rather than on trying to stabilize their hold on the string while pulling it.
• The poundage is adjustable. The axle distance is a good distance for a compound bow like this unit. The twin cam system also produces a smooth draw-cycle. The material used on this system looks strong and sturdy.
• This bow shoots targets accurately. If accuracy needs to be enhanced, there are many upgrades available for the unit.
• The price is unbeatable.
Here are the Cons:
• Some parts are made of plastic. Check the 3-pin sight and the arrow rest. You might have some issues with the material used for these parts.
• It is manufactured outside the US. You might have issues with that as well.
• The screw that is to be used to connect the cable guard to the riser is super tiny. It can be easy to lose or misplace this part if you are performing maintenance on this part of the bow.
• There is no manual accompanying the unit. Considering that it needs upgrading to enhance many of its properties, this is a serious oversight on the part of the manufacturer. However, SAS has a manual on its site. It requires you to visit the site every time you need to confirm if what you are doing with the bow is alright or not.
SAS Siege Compound Bow – Activities and Usage:
With this bow, you can undertake a lot of activities. Remember, you can buy two or three units of this model so everyone in the family can enjoy shooting together, including your children, have a spare unit to use for practicing.
Suggested activities include the following:
• Bow fishing – Since this bow has a lot of pre-drilled holes, there should be no problem attaching a bow fishing reel to it. With a maximum of 206 fps, you will surely kill any fish that you will be able to hit with your reel. Because its weight is just enough for underwater bow fishing, you can go deep diving and catch more fish.
• Bow hunting – This is for those who would rather go bow hunting than using a rifle. This bow is more than suitable for anyone wanting to hunt using a bow, the 206 fps that the arrow can reach when launched should be more than enough for even larger game.
• Target shooting – This bow is more than suitable for simply enjoying some archery practice, the sights and rests included in the package provide enough comfort and accuracy to hit most targets between a short to medium range, depending on your proficiency. For longer range shots it would be beneficial to purchase some upgrades for the bow.
There are many more activities you can do using this bow. You can join shooting competitions, or throw a party and play a bow and arrow game with your guests.